Warped plywood is a common challenge that can frustrate woodworkers and compromise project results. Fortunately, there are proven approaches for addressing warped sheets of plywood and restoring them to an even, flat surface suitable for woodworking.
Plywood warps when it absorbs excess moisture or dries unevenly, causing one ply to expand more than another. Over time, this leads to cupping, twisting and other forms of severe warping.
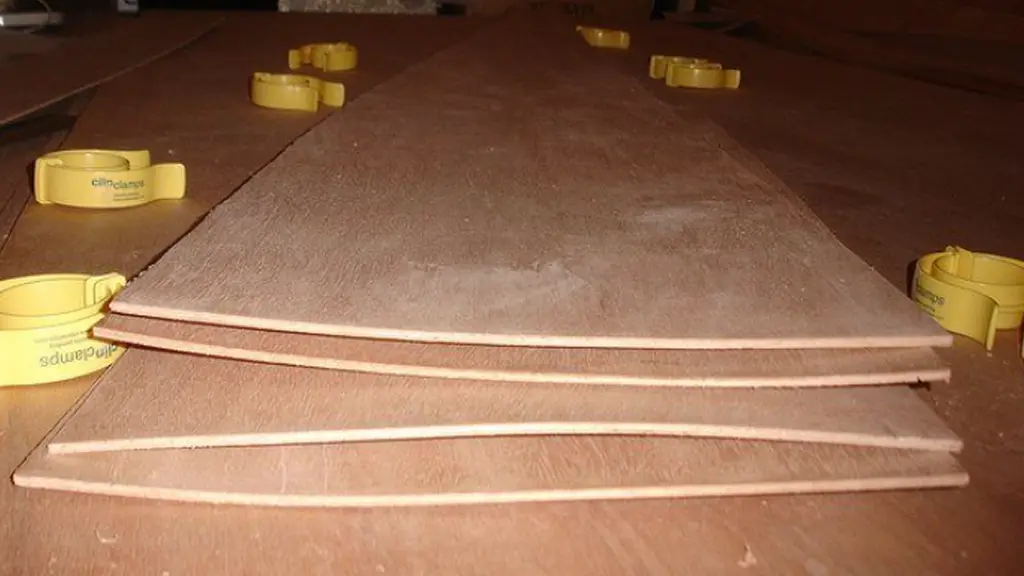
The ability to effectively flatten warped plywood is an essential woodworking skill. It allows you to salvage sheets that would otherwise be unusable, maximizing your material resources.
With the right methods, patience and proper storage afterwards, you can remediate warped plywood and reduce the likelihood of recurrence.
How to Flatten Warped Plywood
This article provides a step-by-step outline covering the materials, techniques and precautions needed to successfully flatten even severely warped plywood sheets.
By following these best practices and recommendations, you’ll be empowered to tackle this common workshop challenge with confidence and get projects back on track.
With the proper approach and diligence, warped plywood need not derail your woodworking – it can be remediated and put to good use, adding versatility to your materials and projects.
Materials required
To successfully flatten warped plywood, you’ll need the following materials:
Humidifier: Adding moisture to the air helps loosen up a dried-out, warped sheet of plywood so it will flatten easier. A standardhousehold humidifier will work.
Weights: Heavy weights are essential to keep the plywood flat and immobile while it reabsorbs moisture. Metal weights, sandbags, cinder blocks and firewood all work well.
Wood clamps: Meduim and heavy-duty bar clamps are needed to apply uniform inward pressure across the perimeter of the plywood while it flattens.
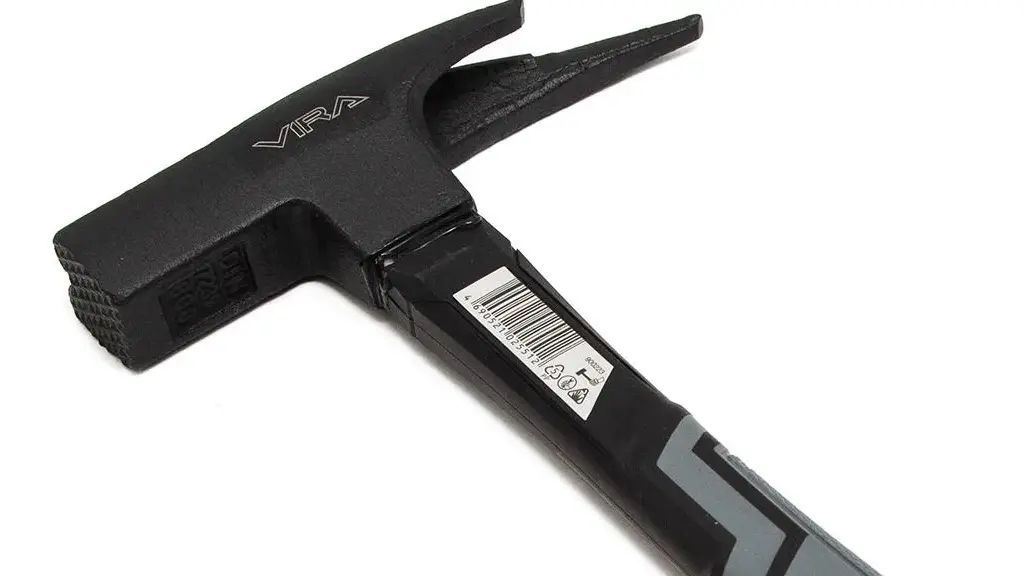
Hammer: A wood or rubber mallet can be used to tap the plywood lightly while clamped, helping it flatten out minor warps and kinks.
Wood glue: An exterior-rated wood glue applies a permanent bond to the plywood plies, helping keep them in proper alignment once flattened.
Wood filler: Any exterior-rated wood filler can be used to fill in residual gaps once the plywood has been flattened, evening out the surface for sanding.
By having these essential materials on hand, you’ll be prepared to tackle any degree of plywood warpage with the techniques outlined in this article. A systematic approach and the proper tools will give you the best chance of success in flattening your warped plywood sheets.
Preparing the warped plywood
Before attempting to flatten a warped sheet of plywood, it’s important to properly prepare the sheet. This involves the following steps:
Cutting it to size: If the plywood is larger than needed for your project, cut it down to the proper dimensions first. This will make it easier to handle and flatten.
Cleaning and sanding: Use a rag and tack cloth to remove any dust, dirt or debris from the plywood surfaces. Then sand all faces lightly with 120-grit sandpaper. This will prepare the surfaces for proper glue adhesion.
Inspecting for damage: Closely examine the plywood for any splits, cracks or delamination between the plies. Pieces with severe damage may not flatten properly and should be discarded.
By taking the time to prepare the warped plywood sheet correctly – cutting it to final size, removing contaminants and evaluating its condition – you set the stage for a successful flattening.
With only properly structurally intact sheets, you can then focus your efforts on the moisture and clamping techniques needed to flatten the plywood.
Approaching the flattening process systematically and thoroughly will maximize your chances of salvaging the material.
Worn, damaged or excessively warped plywood is best discarded to avoid wasting time and effort on pieces with a poor prognosis for flattening successfully.
But with preparation and discrimination, you can identify sheets that are good candidates for rehabilitation using the techniques in this article.
Warm water method

The warm water method is a simple and effective technique for flattening moderately warped plywood:
Soaking in warm water: Fill a large tub or kiddie pool with warm water (around 100°F). Submerge the warped plywood and weights for 30-60 minutes. The heat and moisture will soften the wood fibers and loosen the adhesive between plies.
Adding weights and clamps: Remove the plywood from the water and immediately clamp it between boards to serve as a flat surface. Apply heavy weights (50-100 lbs) to the centers of the plywood.
Letting it dry completely: Leave the plywood weighted and clamped until it is completely dry, at least 24-48 hours. The clamping pressure and weights force the plywood plies to adhere in their flattened position as the wood dries.
Sanding again: Once fully dried, remove the clamps and re-sand the plywood surfaces to prepare for glue application if needed.
By soaking the plywood in heated water, you cause the wood fibers to swell slightly and loosen the bond between plies.
The compressive force of clamping and weights then drives out excess moisture while imprinting the flattened shape as the piece dries thoroughly. With patience, this low-tech method can flatten moderately warped plywood with consistent results.
Proper drying time and even clamping/weighting are critical to success. Minor imperfections may remain and require additional sanding, but the plywood’s basic flatness will have been restored.
Using a humidifier
For severe warps that require a slower, more controlled approach, using a household humidifier can help flatten warped plywood. This method involves:
Setting the humidifier up: Place the humidifier in the room with the warped plywood. Run it continuously on high output settings for 1-2 days to raise the ambient humidity levels.
Applying wood glue to joint: Once the environment is very humid, apply exterior wood glue to the joints between plies on the warped plywood.
Clamping and weighting down: Firmly clamp the plywood between flat panels and secure heavy weights to the centers. The high humidity will help the glue bond properly as the plies flatten.
The increased moisture content of the wood fibers, thanks to the humidifier, allows the plies to move and re-adhere more easily as you apply clamping and weighting force.
The glue helps hold the flattened shape in place as the moisture content begins to normalize and the wood dries.
Slowly raising the ambient humidity with a humidifier provides a more controlled approach compared to soaking the wood itself. The moisture is absorbed evenly, allowing severe warps to be corrected in stages over 1-2 days.
Once the plywood is clamped and weighted, leave it in the humid environment for at least 48 hours to ensure complete drying and glue curing. Then release the clamps and weights, and resume normal humidity levels in the room.
Hammering method
For plywood with minor warps or kinks, a hammering technique while clamped can help flatten the sheet. This involves:
Applying wood glue to joint: Spread exterior wood glue along the joints between plies on the warped plywood. This will help hold the pieces in place once flattened.
Clamping and weighting down: Firmly clamp the plywood between flat panels and apply moderate to heavy weights on top. The clamping and weight hold the basic shape while you hammer.
Hammering lightly while clamped: With a rubber mallet or small wood hammer, gently tap along the perimeter and across any severe warps in the plywood. Take your time, applying 10-20 light strikes per warped area.
The hammer blows pack the wood fibers down slightly, pushing out excess gaps between plies and inducing some wood movement that allows minor warps to be hammered flat.
The clamping and weighting provide resistance for the hammer blows while also holding the plywood firmly in the desired flattened shape. The wood glue helps secure the plies and fill gaps created by the hammering.
Once hammered flat, leave the plywood weighted and clamped for at least 12 hours to ensure complete glue drying. Then release and sand any remaining gaps for a smooth surface.
With patience and a gentle touch, this simple hammering technique can help flatten plywood with minor warps – as long as the basic sheet structure remains intact.
The clamping and weighting provide stability while the controlled hammer blows induce the movement needed to flatten kinks and minor twists.
Using wood filler
Even after flattening warped plywood, minor gaps may remain between the plies where the adhesive bond has weakened. To fill these gaps and create a smooth surface for sanding, use exterior-rated wood filler:
Applying filler to any gaps: Once the plywood is clamped flat, inspect the surfaces for gaps between plies. Apply wood filler to the gaps using a putty knife, spreading it evenly into the recesses.
Sanding smooth when dry: Allow the wood filler to dry completely, following the manufacturer’s instructions. Then sand the filled surfaces smooth using 120-180 grit sandpaper.
By filling any minor gaps left after flattening warped plywood, wood filler helps:
- Create a continuous, even surface that will sand smoothly
- Restore the adhesive bond between plies at the filled areas
- Prevent moisture from wicking into gapsthat could cause future problems
Look for exterior-rated wood fillers formulated to expand and contract similarly to wood. These will bond permanently and remain intact over repeated moisture fluctuations.
With patience and careful application, wood filler cam seamlessly repair minor imperfections leftover from correcting plywood warps. After sanding smooth, the filled surfaces will be virtually indistinguishable from the original plywood.
Combined with the flattening techniques covered here, using wood filler represents the final step in maximizing your material resources and salvaging warped sheets of plywood.
Storing properly
After going through the effort to flatten warped plywood, proper storage is essential to prevent the same issues from recurring:
Keeping in low humidity: Store flattened plywood sheets in an indoor area with consistent humidity levels under 60%. Fluctuating or high humidity promotes warping.
Avoiding exposure to moisture: Keep the plywood off the floor, away from direct moisture sources like windows. Covering sheets with a moisture-resistant cover also helps.
Using spacers when stacking: When stacking flattened plywood, insert spacer blocks made of wood or plastic between sheets. This allows airflow and reduces concentrated pressure points that can distort the sheets.
By storing flattened plywood in a properly controlled environment with spacers between sheets, you reduce the risk of uneven moisture absorption that causes warping. Consistent low humidity and good ventilation minimize the chance of twisted sheets or cupping recurrence.
Periodically inspecting stored plywood for signs of warping allows you to address issues early before they become severe. Simply flipping sheets occasionally also helps redistribute any localized moisture that may accumulate.
With a few best practices around environment, stacking and inspection, properly storing flattened plywood extends the lifespan of your material and prevents wasted effort from recurrent warpage. Control the conditions and maximize your material resources for future projects.
Final check and sanding
Before considering a warped plywood sheet fully flattened, conduct a final check and sanding:
Inspecting for remaining warps: Visually inspect and physically test the flattened plywood for any lingering warps, cupping or twists. Gently apply pressure and ensure all surfaces feel smooth and even.
Sanding any rough edges: Using 120 – 150 grit sandpaper, sand all exposed surfaces of the plywood to create a smooth finish. This will scuff up any filler and reveal minor imperfections for correction.
This final check serves as quality control before storing or using the flattened sheet. With a critical eye, you can identify:
- Any areas requiring additional clamping or filler
- Minor imperfections that could worsen over time
- Surface roughness that needs sanding
By catching and addressing issues at this late stage, before the piece is put into service, you further reduce the likelihood of recurrence and set the flattened sheet up for long-term stability and performance.
With patience and diligence, a final inspection and light sanding can result in a virtually perfect, flat sheet of plywood ready to be incorporated into your projects with confidence. Consistent dimensions and an even surface make layout and joinery accurate and precise.
Take the time for this crucial final step to ensure your flattened plywood meets your high standards for flatness and smoothness, extending its useful life and capabilities.
Conclusion
In summary, warped plywood can be effectively flattened using various techniques to rehydrate and apply uniform pressure to the wood.
With the right materials, preparation and attention to detail, even severely warped sheets can be salvaged and put to good use.
The key is a systematic approach: proper material selection, thorough preparation of the plywood, choosing the best flattening technique for the degree of warping, supplementing with wood filler as needed, proper drying and storage afterwards.
With patience and persistence, what initially seems like a problem sheet of warped plywood can be rehabilitated to like-new flatness through proven methods.
What was once worthless can be transformed into a usable and dimensionally stable resource for your projects.
If you follow the outline provided in this article, focusing on things like “humidity,” “clamping,” “weighting,” hammering,” and “stabilization,” you’ll give yourself the best chance of success in flattening warped plywood.
With consistency and diligence, the basic woodworking skill of correcting plywood warping can be mastered.
So don’t let that warped sheet of plywood discourage you. With the right tools, materials and know-how, you can salvage it and put it to good use once more.
Get started on flattening your next warped sheet with the confidence that comes from a systematic, thorough and optimized approach.


")